前篇主要介绍了prefuse如何连接数据库sql server并读取数据进行可视化展现。
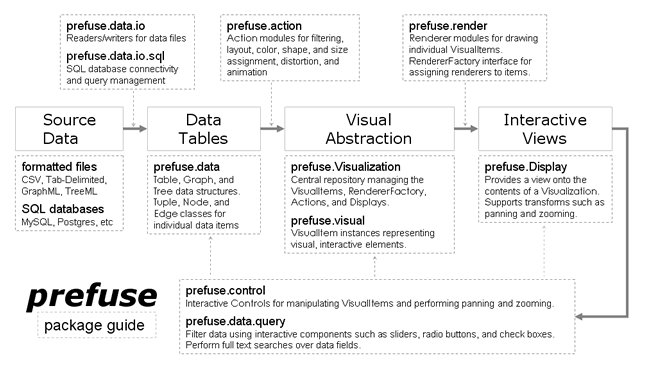
回头想想还是应该好好捋一捋prefuse框架中各个主要接口的职责以及如何有序使用它们构建一个prefuse应用。首先看图:

从图中可以发现一个prefuse程序的编写需要经历以下步骤:
- 准备好原始数据(文件或是数据库数据);
- 通过prefuse.data.io以及prefuse.data.io.sql包将数据读入prefuse,实现原始数据与内置丰富的数据结构如Table、Graph、Tree等之间的映射;
- 为数据添加各种Action,执行布局、着色、设置形状等操作;
- 将上面处理好的数据存入数据存储中心Visuallization中;
- 为可视化组件添加渲染器Renderer,并将渲染器注册到Visualization上;
- 通过Display将Visualization中的可视化组件显示到屏幕上;
- 通过上图发现是个闭环图,当执行控制器以及过滤操作后又会得到更新后的Visualization,之后依次执行3、4、5、6步骤。
下面我们通过一个例子具体了解如何创建一个prefuse应用。
1. 加载数据:
首先是加载图数据到Prefuse的图实例中,这里用的是socialnet.xml数据集。代码中使用GraphMLReader类读取数据集。
在方法readGraph中关于能读取“/socialnet.xml”文件的说明:通过读源码发现首先会检查这个字符串是不是一个URL链接,如果是的话则直接打开这个链接,如果不是则检查其是否是一个Java Runtime 内的classpath资源链接,如果还不是,则会将该字符串视为一个文件或是文件系统。
Graph graph = null;try { graph = new GraphMLReader().readGraph("/socialnet.xml");} catch ( DataIOException e ) { e.printStackTrace(); System.err.println("Error loading graph. Exiting..."); System.exit(1);}
2 .创建数据存储中心Visualization实例:
创建一个抽象的视觉图形。在此之前,需要创建一个Visualization实例并添加图形数据,同时在代码中可以看到还要赋给一个名称(group name)。当图或树的实例添加到Visualization对象上的时候,另外两个子组名(subgroups)也会自动被创建:一个是节点(以“.nodes”为后缀),一个是边(以“.edges”为后缀)
// add the graph to the visualization as the data group "graph"// nodes and edges are accessible as "graph.nodes" and "graph.edges"Visualization vis = new Visualization();vis.add("graph", graph);
3.渲染和渲染工厂的创建:
使用Renderers渲染器绘制Visualization对象中的VisualItems。默认情况下,Visualization类中包含了DefaultRendererFactory,其使用EdgeRenderer(默认绘制直连边)、ShapeRenderer绘制图形(比如正方形或三角形)。当希望看到节点上标签值是,可以创建一个LabelRenderers并为标签数据域赋值。
// draw the "name" label for NodeItemsLabelRenderer r = new LabelRenderer("name");r.setRoundedCorner(8, 8); // round the corners// create a new default renderer factory// return our name label renderer as the default for all non-EdgeItems// includes straight line edges for EdgeItems by defaultvis.setRendererFactory(new DefaultRendererFactory(r));
4.添加处理的动作Actions:
添加所需的视觉效果。通过创建不同的Action模块处理Visualization上的VisualItems。比如可以创建一个颜色动作事件(ColorActions),该VisualItem默认支持三种颜色赋值:描边颜色、填充颜色以及文本颜色。描边的颜色是线条和轮廓的颜色;填充颜色是VisualItem的内部颜色;文本颜色是文本或是标签的颜色。默认情况下,所有颜色都是纯透明的。ColorLib类提供了很多颜色赋值的方法。
通过以下代码可以看出通过创建DataColorAction完成颜色分配工作。DataColorAction构造器的参数如下:
(1)要运行的数据组名(这里是graph.nodes)
(2)数据域的名称(这里是gender)
(3)数据域的数据类型,有三种:NOMINAL(适用于类别标签集),ORDINAL(适用于有序集合),以及NUMERICAL(适用于数字)。
(4)颜色域的设置,有描边、填充和文本三种。
(5)可选的调色板
注意:这里DataColorAction对于赋值颜色的选取也是有排序的,一般是自然排序的顺序,比如对于文本来说是按照字母表的先后顺序来的。这就是为什么这里的粉红色排在前面,因为按照字母顺序,“F”排在“M”的前面。
// create our nominal color palette// pink for females, baby blue for malesint[] palette = new int[] { ColorLib.rgb(255,180,180), ColorLib.rgb(190,190,255)};// map nominal data values to colors using our provided paletteDataColorAction fill = new DataColorAction("graph.nodes", "gender", Constants.NOMINAL, VisualItem.FILLCOLOR, palette);// use black for node textColorAction text = new ColorAction("graph.nodes", VisualItem.TEXTCOLOR, ColorLib.gray(0));// use light grey for edgesColorAction edges = new ColorAction("graph.edges", VisualItem.STROKECOLOR, ColorLib.gray(200));// create an action list containing all color assignmentsActionList color = new ActionList();color.add(fill);color.add(text);color.add(edges); 接着再创建关于动画布局的ActionList。所有的Action都可以进行参数控制的指定运行多少次(默认情况下是一次),也可以限定指定间隔时间运行,或者指定间隔时间无限制运行。代码中通过添加ForceDirectedLayout布局来进行图中节点的位置更新。添加RepaintAction()来实现当布局重新计算后就进行图形重绘的功能。
// create an action list with an animated layout// the INFINITY parameter tells the action list to run indefinitelyActionList layout = new ActionList(Activity.INFINITY);layout.add(new ForceDirectedLayout("graph"));layout.add(new RepaintAction()); 然后将这两个ActionLists添加到Visualization上,每个注册的Action都有唯一标示以方便调用。
// add the actions to the visualizationvis.putAction("color", color);vis.putAction("layout", layout); 5.展现和交互控制:
创建Display实现数据可视化。这里创建一个Display实例将Visualization中的Visualitems进行参数配置。可以设置想要展现的Display的大小、像素。这里,我们添加三个交互控制器:
(1) 拖拽控制
(2) 平移控制
(3) 缩放控制
// create a new Display that pull from our VisualizationDisplay display = new Display(vis);display.setSize(720, 500); // set display sizedisplay.addControlListener(new DragControl()); // drag items arounddisplay.addControlListener(new PanControl()); // pan with background left-dragdisplay.addControlListener(new ZoomControl()); // zoom with vertical right-drag
6.可视化呈现:
剩下要做的就是添加Display显示到一个应用程序窗口并让程序运行。该例中,创建Java Swing编程中的顶级类JFrame,设置标题。“pack”可以使得窗口合适的布局并确保窗口可见。
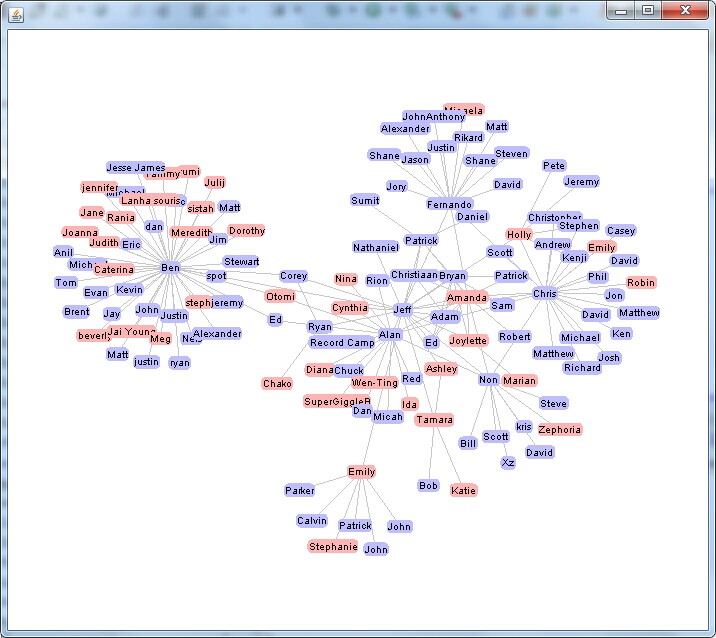
// create a new window to hold the visualizationJFrame frame = new JFrame("prefuse example");// ensure application exits when window is closedframe.setDefaultCloseOperation(JFrame.EXIT_ON_CLOSE);frame.add(display);frame.pack(); // layout components in windowframe.setVisible(true); // show the windowvis.run("color"); // assign the colorsvis.run("layout"); // start up the animated layout 执行结果如下:

另外,在篇中,对GraphView.java进行了阅读并注释,这里再贴出RadialGraphView.java和TreeView.java的部分注释。
RadialGraphView.java


public class RadialGraphView extends Display { public static final String DATA_FILE = "socialnet.xml"; private static final String tree = "tree"; private static final String treeNodes = "tree.nodes"; private static final String treeEdges = "tree.edges"; private static final String linear = "linear"; private LabelRenderer m_nodeRenderer; private EdgeRenderer m_edgeRenderer; private String m_label = "label"; public RadialGraphView(Graph g, String label) { super(new Visualization()); m_label = label; // -- set up visualization -- m_vis.add(tree, g);//将graph对象添加到m_vis对象上 m_vis.setInteractive(treeEdges, null, false); // -- set up renderers -- 设置点和边的渲染器 m_nodeRenderer = new LabelRenderer(m_label); m_nodeRenderer.setRenderType(AbstractShapeRenderer.RENDER_TYPE_FILL); m_nodeRenderer.setHorizontalAlignment(Constants.CENTER); m_nodeRenderer.setRoundedCorner(8,8); m_edgeRenderer = new EdgeRenderer(); DefaultRendererFactory rf = new DefaultRendererFactory(m_nodeRenderer); rf.add(new InGroupPredicate(treeEdges), m_edgeRenderer); m_vis.setRendererFactory(rf); // -- set up processing actions -- // colors ItemAction nodeColor = new NodeColorAction(treeNodes); ItemAction textColor = new TextColorAction(treeNodes); m_vis.putAction("textColor", textColor); ItemAction edgeColor = new ColorAction(treeEdges, VisualItem.STROKECOLOR, ColorLib.rgb(200,200,200));//新建边颜色Action FontAction fonts = new FontAction(treeNodes, FontLib.getFont("Tahoma", 10));//设置节点大小以及字体 fonts.add("ingroup('_focus_')", FontLib.getFont("Tahoma", 11)); // recolor 新建重新着色ActionList,并添加上面的节点和边Action ActionList recolor = new ActionList(); recolor.add(nodeColor); recolor.add(textColor); m_vis.putAction("recolor", recolor); // repaint 新建重绘ActionList,并加入recolor以及RepaintAction ActionList repaint = new ActionList(); repaint.add(recolor); repaint.add(new RepaintAction()); m_vis.putAction("repaint", repaint); // animate paint change ActionList animatePaint = new ActionList(400); animatePaint.add(new ColorAnimator(treeNodes)); animatePaint.add(new RepaintAction()); m_vis.putAction("animatePaint", animatePaint); // create the tree layout action 采用径向树布局 RadialTreeLayout treeLayout = new RadialTreeLayout(tree); //treeLayout.setAngularBounds(-Math.PI/2, Math.PI); m_vis.putAction("treeLayout", treeLayout); CollapsedSubtreeLayout subLayout = new CollapsedSubtreeLayout(tree);//折叠子树布局 m_vis.putAction("subLayout", subLayout); // create the filtering and layout 创建过滤器和布局 在图形呈现之前,做好过滤filter工作 ActionList filter = new ActionList(); filter.add(new TreeRootAction(tree)); filter.add(fonts); filter.add(treeLayout); filter.add(subLayout); filter.add(textColor); filter.add(nodeColor); filter.add(edgeColor); m_vis.putAction("filter", filter); // animated transition 动画过渡 ActionList animate = new ActionList(1250); animate.setPacingFunction(new SlowInSlowOutPacer());//起搏功能,提供渐入渐出效果 animate.add(new QualityControlAnimator());//可以平滑切换动画的动画控制器 animate.add(new VisibilityAnimator(tree)); animate.add(new PolarLocationAnimator(treeNodes, linear)); animate.add(new ColorAnimator(treeNodes)); animate.add(new RepaintAction()); m_vis.putAction("animate", animate); m_vis.alwaysRunAfter("filter", "animate"); // initialize the display setSize(600,600);//初始化JFrame大小 注意:这里没有像GraphView一样创建Display对象,是因为该类RadialGraphView继承 了Display,可以直接调用方法 setItemSorter(new TreeDepthItemSorter());//为树状深度设置排序分类器 addControlListener(new DragControl());//一下都是设置监听类,包括拖拽、缩放至适合显示、平移、聚焦、悬停 addControlListener(new ZoomToFitControl()); addControlListener(new ZoomControl()); addControlListener(new PanControl()); addControlListener(new FocusControl(1, "filter")); addControlListener(new HoverActionControl("repaint")); // filter graph and perform layout m_vis.run("filter"); // maintain a set of items that should be interpolated linearly // this isn't absolutely necessary, but makes the animations nicer // the PolarLocationAnimator should read this set and act accordingly m_vis.addFocusGroup(linear, new DefaultTupleSet()); m_vis.getGroup(Visualization.FOCUS_ITEMS).addTupleSetListener(//添加数据集监听器,监听数据变化 new TupleSetListener() { public void tupleSetChanged(TupleSet t, Tuple[] add, Tuple[] rem) { TupleSet linearInterp = m_vis.getGroup(linear); if ( add.length < 1 ) return; linearInterp.clear(); for ( Node n = (Node)add[0]; n!=null; n=n.getParent() ) linearInterp.addTuple(n); } } ); SearchTupleSet search = new PrefixSearchTupleSet();//监听搜索栏数据 m_vis.addFocusGroup(Visualization.SEARCH_ITEMS, search); search.addTupleSetListener(new TupleSetListener() { public void tupleSetChanged(TupleSet t, Tuple[] add, Tuple[] rem) { m_vis.cancel("animatePaint"); m_vis.run("recolor"); m_vis.run("animatePaint"); } }); } // ------------------------------------------------------------------------ public static void main(String argv[]) { String infile = DATA_FILE; String label = "name"; if ( argv.length > 1 ) { infile = argv[0]; label = argv[1]; } UILib.setPlatformLookAndFeel(); JFrame frame = new JFrame("p r e f u s e | r a d i a l g r a p h v i e w"); frame.setDefaultCloseOperation(JFrame.EXIT_ON_CLOSE); frame.setContentPane(demo(infile, label)); frame.pack(); frame.setVisible(true); } public static JPanel demo() { return demo(DATA_FILE, "name"); } public static JPanel demo(String datafile, final String label) { Graph g = null; try { g = new GraphMLReader().readGraph(datafile); } catch ( Exception e ) { e.printStackTrace(); System.exit(1); } return demo(g, label); } public static JPanel demo(Graph g, final String label) { // create a new radial tree view //创建一个径向树形布局 final RadialGraphView gview = new RadialGraphView(g, label); Visualization vis = gview.getVisualization(); // create a search panel for the tree map SearchQueryBinding sq = new SearchQueryBinding( (Table)vis.getGroup(treeNodes), label, (SearchTupleSet)vis.getGroup(Visualization.SEARCH_ITEMS)); JSearchPanel search = sq.createSearchPanel(); search.setShowResultCount(true); search.setBorder(BorderFactory.createEmptyBorder(5,5,4,0)); search.setFont(FontLib.getFont("Tahoma", Font.PLAIN, 11)); final JFastLabel title = new JFastLabel(" "); title.setPreferredSize(new Dimension(350, 20)); title.setVerticalAlignment(SwingConstants.BOTTOM); title.setBorder(BorderFactory.createEmptyBorder(3,0,0,0)); title.setFont(FontLib.getFont("Tahoma", Font.PLAIN, 16)); gview.addControlListener(new ControlAdapter() { //为搜索框添加监听事件 public void itemEntered(VisualItem item, MouseEvent e) { if ( item.canGetString(label) )//如果搜索框文本发生变化,则将最新文本值赋给搜索文本框 title.setText(item.getString(label)); } public void itemExited(VisualItem item, MouseEvent e) { //如果搜索框失去焦点,则置搜索文本框值为空 title.setText(null); } }); Box box = new Box(BoxLayout.X_AXIS);//创建盒子容器,装在上面的搜索面板和搜索文本框(安装水平方向布局) box.add(Box.createHorizontalStrut(10)); box.add(title); box.add(Box.createHorizontalGlue()); box.add(search); box.add(Box.createHorizontalStrut(3)); JPanel panel = new JPanel(new BorderLayout());//按照组件级别从小到大,先创建JPanel对象,并将上面的RadialGraphView和Box注册到JPanel上 panel.add(gview, BorderLayout.CENTER);//RadialGraphView对象放到面板中间位置 panel.add(box, BorderLayout.SOUTH);//Box对象放到面板南边位置 Color BACKGROUND = Color.WHITE; Color FOREGROUND = Color.DARK_GRAY; UILib.setColor(panel, BACKGROUND, FOREGROUND);//设置整个panel面板的前景和背景颜色 return panel; } /** * Switch the root of the tree by requesting a new spanning tree * at the desired root */ public static class TreeRootAction extends GroupAction { public TreeRootAction(String graphGroup) { super(graphGroup); } public void run(double frac) { TupleSet focus = m_vis.getGroup(Visualization.FOCUS_ITEMS);//如果没有点被选中或选中为空则跳出run函数 if ( focus==null || focus.getTupleCount() == 0 ) return; Graph g = (Graph)m_vis.getGroup(m_group); Node f = null; Iterator tuples = focus.tuples(); while (tuples.hasNext() && !g.containsTuple(f=(Node)tuples.next()))//迭代选中的焦点,如果选中焦点不是上次的焦点,则置f为空,并跳出run函数 { f = null; } if ( f == null ) return; g.getSpanningTree(f);//返回一个生成树 } } /** * Set node fill colors 设置点的填充色 */ public static class NodeColorAction extends ColorAction { public NodeColorAction(String group) { super(group, VisualItem.FILLCOLOR, ColorLib.rgba(255,255,255,0)); add("_hover", ColorLib.gray(220,230)); add("ingroup('_search_')", ColorLib.rgb(255,190,190)); add("ingroup('_focus_')", ColorLib.rgb(198,229,229)); } } // end of inner class NodeColorAction /** * Set node text colors 设置点内文本颜色 */ public static class TextColorAction extends ColorAction { public TextColorAction(String group) { super(group, VisualItem.TEXTCOLOR, ColorLib.gray(0)); add("_hover", ColorLib.rgb(255,0,0)); } } // end of inner class TextColorAction } // end of class RadialGraphView TreeView.java


public class TreeView extends Display { public static final String TREE_CHI = "chi-ontology.xml.gz"; private static final String tree = "tree"; private static final String treeNodes = "tree.nodes"; private static final String treeEdges = "tree.edges"; private LabelRenderer m_nodeRenderer; private EdgeRenderer m_edgeRenderer; private String m_label = "label"; private int m_orientation = Constants.ORIENT_LEFT_RIGHT;//设置树的布局方式,有left->right,right->left,top->bottom,bottom->top共四种方式 public TreeView(Tree t, String label) { super(new Visualization()); m_label = label; m_vis.add(tree, t);//将tree注册到m_vis对象上 m_nodeRenderer = new LabelRenderer(m_label);//新建节点和边的渲染器 m_nodeRenderer.setRenderType(AbstractShapeRenderer.RENDER_TYPE_FILL); m_nodeRenderer.setHorizontalAlignment(Constants.LEFT); m_nodeRenderer.setRoundedCorner(8,8); m_edgeRenderer = new EdgeRenderer(Constants.EDGE_TYPE_CURVE); DefaultRendererFactory rf = new DefaultRendererFactory(m_nodeRenderer); rf.add(new InGroupPredicate(treeEdges), m_edgeRenderer); m_vis.setRendererFactory(rf);//将上面的点和边的渲染器注册到DefaultRendererFactory,再添加到m_vis对象上 // colors ItemAction nodeColor = new NodeColorAction(treeNodes); ItemAction textColor = new ColorAction(treeNodes, VisualItem.TEXTCOLOR, ColorLib.rgb(0,0,0)); m_vis.putAction("textColor", textColor); ItemAction edgeColor = new ColorAction(treeEdges, VisualItem.STROKECOLOR, ColorLib.rgb(200,200,200)); // quick repaint ActionList repaint = new ActionList(); repaint.add(nodeColor); repaint.add(new RepaintAction()); m_vis.putAction("repaint", repaint); // full paint ActionList fullPaint = new ActionList(); fullPaint.add(nodeColor); m_vis.putAction("fullPaint", fullPaint); // animate paint change ActionList animatePaint = new ActionList(400); animatePaint.add(new ColorAnimator(treeNodes)); animatePaint.add(new RepaintAction()); m_vis.putAction("animatePaint", animatePaint); // create the tree layout action NodeLinkTreeLayout treeLayout = new NodeLinkTreeLayout(tree, m_orientation, 50, 0, 8);//50代表树深度之间的距离 0代表兄弟节点之间的距离 8代表相邻子树之间的距离 treeLayout.setLayoutAnchor(new Point2D.Double(25,300)); m_vis.putAction("treeLayout", treeLayout); CollapsedSubtreeLayout subLayout = new CollapsedSubtreeLayout(tree, m_orientation); m_vis.putAction("subLayout", subLayout); AutoPanAction autoPan = new AutoPanAction(); // create the filtering and layout 在图形呈现之前,做好过滤filter工作,包括默认显示几层树,采用什么布局,节点和边如何展示等等 ActionList filter = new ActionList(); filter.add(new FisheyeTreeFilter(tree, 2));//添加一个鱼眼树形过滤器 设置初始界面显示几层节点 filter.add(new FontAction(treeNodes, FontLib.getFont("Tahoma", 16))); filter.add(treeLayout); filter.add(subLayout); filter.add(textColor); filter.add(nodeColor); filter.add(edgeColor); m_vis.putAction("filter", filter); // animated transition 动画过渡 ActionList animate = new ActionList(1000); animate.setPacingFunction(new SlowInSlowOutPacer());//使用SlowInSlowOutPacer可以实现一开始速度缓慢,中途加速,即将停止之前变慢的效果 animate.add(autoPan); animate.add(new QualityControlAnimator()); animate.add(new VisibilityAnimator(tree)); animate.add(new LocationAnimator(treeNodes)); animate.add(new ColorAnimator(treeNodes)); animate.add(new RepaintAction());//从RepaintAction的构造函数可以看出每次执行RepaintAction时都会执行m_vis,即刷新执行一个上面的m_vis,所以就不需要add上面的sublayout、treelayout、filter等,因为这些已经被putAction进入m_vis了 m_vis.putAction("animate", animate); m_vis.alwaysRunAfter("filter", "animate");//第一个参数:等待的Action名称 第二个参数:第一个Action运行完再运行的Action // create animator for orientation changes 针对图形布局方向改变时进行的操作 ActionList orient = new ActionList(2000); orient.setPacingFunction(new SlowInSlowOutPacer()); orient.add(autoPan); orient.add(new QualityControlAnimator()); orient.add(new LocationAnimator(treeNodes)); orient.add(new RepaintAction()); m_vis.putAction("orient", orient); // initialize the display setSize(700,600); setItemSorter(new TreeDepthItemSorter()); addControlListener(new ZoomToFitControl()); addControlListener(new ZoomControl()); addControlListener(new WheelZoomControl()); addControlListener(new PanControl()); addControlListener(new FocusControl(1, "filter"));//其中1代表鼠标聚焦点击的次数 registerKeyboardAction(//注册快捷键响应事件 ctrl+1、ctrl+2、ctrl+3、ctrl+4分别对应不同的布局方式 new OrientAction(Constants.ORIENT_LEFT_RIGHT), "left-to-right", KeyStroke.getKeyStroke("ctrl 1"), WHEN_FOCUSED); registerKeyboardAction( new OrientAction(Constants.ORIENT_TOP_BOTTOM), "top-to-bottom", KeyStroke.getKeyStroke("ctrl 2"), WHEN_FOCUSED); registerKeyboardAction( new OrientAction(Constants.ORIENT_RIGHT_LEFT), "right-to-left", KeyStroke.getKeyStroke("ctrl 3"), WHEN_FOCUSED); registerKeyboardAction( new OrientAction(Constants.ORIENT_BOTTOM_TOP), "bottom-to-top", KeyStroke.getKeyStroke("ctrl 4"), WHEN_FOCUSED); // ------------------------------------------------ // filter graph and perform layout setOrientation(m_orientation); m_vis.run("filter"); TupleSet search = new PrefixSearchTupleSet(); m_vis.addFocusGroup(Visualization.SEARCH_ITEMS, search); search.addTupleSetListener(new TupleSetListener() { public void tupleSetChanged(TupleSet t, Tuple[] add, Tuple[] rem) { m_vis.cancel("animatePaint"); m_vis.run("fullPaint"); m_vis.run("animatePaint"); } }); } public void setOrientation(int orientation) { NodeLinkTreeLayout rtl = (NodeLinkTreeLayout)m_vis.getAction("treeLayout"); CollapsedSubtreeLayout stl = (CollapsedSubtreeLayout)m_vis.getAction("subLayout"); switch ( orientation ) { case Constants.ORIENT_LEFT_RIGHT: m_nodeRenderer.setHorizontalAlignment(Constants.LEFT); m_edgeRenderer.setHorizontalAlignment1(Constants.RIGHT); m_edgeRenderer.setHorizontalAlignment2(Constants.LEFT); m_edgeRenderer.setVerticalAlignment1(Constants.CENTER); m_edgeRenderer.setVerticalAlignment2(Constants.CENTER); break; case Constants.ORIENT_RIGHT_LEFT: m_nodeRenderer.setHorizontalAlignment(Constants.RIGHT); m_edgeRenderer.setHorizontalAlignment1(Constants.LEFT); m_edgeRenderer.setHorizontalAlignment2(Constants.RIGHT); m_edgeRenderer.setVerticalAlignment1(Constants.CENTER); m_edgeRenderer.setVerticalAlignment2(Constants.CENTER); break; case Constants.ORIENT_TOP_BOTTOM: m_nodeRenderer.setHorizontalAlignment(Constants.CENTER); m_edgeRenderer.setHorizontalAlignment1(Constants.CENTER); m_edgeRenderer.setHorizontalAlignment2(Constants.CENTER); m_edgeRenderer.setVerticalAlignment1(Constants.BOTTOM); m_edgeRenderer.setVerticalAlignment2(Constants.TOP); break; case Constants.ORIENT_BOTTOM_TOP: m_nodeRenderer.setHorizontalAlignment(Constants.CENTER); m_edgeRenderer.setHorizontalAlignment1(Constants.CENTER); m_edgeRenderer.setHorizontalAlignment2(Constants.CENTER); m_edgeRenderer.setVerticalAlignment1(Constants.TOP); m_edgeRenderer.setVerticalAlignment2(Constants.BOTTOM); break; default: throw new IllegalArgumentException( "Unrecognized orientation value: "+orientation); } m_orientation = orientation; rtl.setOrientation(orientation); stl.setOrientation(orientation); } public int getOrientation() { return m_orientation; } // ------------------------------------------------------------------------ public static void main(String argv[]) { String infile = TREE_CHI; String label = "name"; if ( argv.length > 1 ) { infile = argv[0]; label = argv[1]; } JComponent treeview = demo(infile, label); JFrame frame = new JFrame("p r e f u s e | t r e e v i e w"); frame.setDefaultCloseOperation(JFrame.EXIT_ON_CLOSE); frame.setContentPane(treeview); frame.pack(); frame.setVisible(true); } public static JComponent demo() { return demo(TREE_CHI, "name"); } public static JComponent demo(String datafile, final String label) { Color BACKGROUND = Color.WHITE; Color FOREGROUND = Color.BLACK; Tree t = null; try { t = (Tree)new TreeMLReader().readGraph(datafile); } catch ( Exception e ) { e.printStackTrace(); System.exit(1); } // create a new treemap 创建一个树状图并设置前景背景颜色 final TreeView tview = new TreeView(t, label); tview.setBackground(BACKGROUND); tview.setForeground(FOREGROUND); // create a search panel for the tree map 为树状图添加一个搜索文本标签 JSearchPanel search = new JSearchPanel(tview.getVisualization(), treeNodes, Visualization.SEARCH_ITEMS, label, true, true); search.setShowResultCount(true);//显示搜索符合条件的节点个数 search.setBorder(BorderFactory.createEmptyBorder(5,5,4,0)); search.setFont(FontLib.getFont("Tahoma", Font.PLAIN, 11)); search.setBackground(BACKGROUND); search.setForeground(FOREGROUND); final JFastLabel title = new JFastLabel(" ");//为树状图添加一个搜索面板 title.setPreferredSize(new Dimension(350, 20));//长350 宽20 title.setVerticalAlignment(SwingConstants.BOTTOM); title.setBorder(BorderFactory.createEmptyBorder(3,0,0,0)); title.setFont(FontLib.getFont("Tahoma", Font.PLAIN, 16)); title.setBackground(BACKGROUND); title.setForeground(FOREGROUND); tview.addControlListener(new ControlAdapter() { public void itemEntered(VisualItem item, MouseEvent e) { if ( item.canGetString(label) ) title.setText(item.getString(label)); } public void itemExited(VisualItem item, MouseEvent e) { title.setText(null); } }); Box box = new Box(BoxLayout.X_AXIS); box.add(Box.createHorizontalStrut(10)); box.add(title); box.add(Box.createHorizontalGlue()); box.add(search); box.add(Box.createHorizontalStrut(3)); box.setBackground(BACKGROUND); JPanel panel = new JPanel(new BorderLayout()); panel.setBackground(BACKGROUND); panel.setForeground(FOREGROUND); panel.add(tview, BorderLayout.CENTER); panel.add(box, BorderLayout.SOUTH); return panel; } public class OrientAction extends AbstractAction { //方向Action,针对界面中变换布局方式所做的响应 private int orientation; public OrientAction(int orientation) { this.orientation = orientation; } public void actionPerformed(ActionEvent evt) { setOrientation(orientation); getVisualization().cancel("orient"); getVisualization().run("treeLayout"); getVisualization().run("orient");//通过进入getVisualization方法可以发现该方法返回的是m_vis对象,getVisualization().run("orient");等价于m_vis.run("orient"); } } public class AutoPanAction extends Action { private Point2D m_start = new Point2D.Double(); private Point2D m_end = new Point2D.Double(); private Point2D m_cur = new Point2D.Double(); private int m_bias = 150; public void run(double frac) { TupleSet ts = m_vis.getFocusGroup(Visualization.FOCUS_ITEMS); if ( ts.getTupleCount() == 0 ) return; if ( frac == 0.0 ) { int xbias=0, ybias=0; switch ( m_orientation ) { case Constants.ORIENT_LEFT_RIGHT: xbias = m_bias; break; case Constants.ORIENT_RIGHT_LEFT: xbias = -m_bias; break; case Constants.ORIENT_TOP_BOTTOM: ybias = m_bias; break; case Constants.ORIENT_BOTTOM_TOP: ybias = -m_bias; break; } VisualItem vi = (VisualItem)ts.tuples().next(); m_cur.setLocation(getWidth()/2, getHeight()/2); getAbsoluteCoordinate(m_cur, m_start); m_end.setLocation(vi.getX()+xbias, vi.getY()+ybias); } else { m_cur.setLocation(m_start.getX() + frac*(m_end.getX()-m_start.getX()), m_start.getY() + frac*(m_end.getY()-m_start.getY())); panToAbs(m_cur); } } } public static class NodeColorAction extends ColorAction { public NodeColorAction(String group) { super(group, VisualItem.FILLCOLOR); } public int getColor(VisualItem item) { if ( m_vis.isInGroup(item, Visualization.SEARCH_ITEMS) ) return ColorLib.rgb(255,190,190); else if ( m_vis.isInGroup(item, Visualization.FOCUS_ITEMS) ) return ColorLib.rgb(198,229,229); else if ( item.getDOI() > -1 ) return ColorLib.rgb(164,193,193); else return ColorLib.rgba(255,255,255,0); } } // end of inner class TreeMapColorAction } // end of class TreeMap 原文链接:
画外音:1.prefuse真的很全面、很强大,不知道为什么后面一直没有更新,是转为商业化运营了么???
2.感觉研究可视化的小伙伴不是很多啊。。。
友情赞助
如果你觉得博主的文章对你那么一点小帮助,恰巧你又有想打赏博主的小冲动,那么事不宜迟,赶紧扫一扫,小额地赞助下,攒个奶粉钱,也是让博主有动力继续努力,写出更好的文章^^。
1. 支付宝 2. 微信

